MKIII Golf/Jetta Inner and Outer Tie rod DIY.
 This
"how to" assumes you have some basic tools, and safety gear. Safety glasses
should be worn at all times when working with tools and automotive fluids.
Always use a hydraulic jack and safety stands when lifting or getting under a
vehicle. If you are unsure on where to safety lift your vehicle, refer to its
owners guide. Steering and Suspension components should never be heated with a
torch, bent, or welded. Replacement parts must be direct matches and should be
torqued to specification. The writer of this how to assumes zero liability
in how to use this guide, or any damages that may come from it to you, your
property, or others and others property. If you are uncertain at any point,
refer to a qualified automotive technician.
This
"how to" assumes you have some basic tools, and safety gear. Safety glasses
should be worn at all times when working with tools and automotive fluids.
Always use a hydraulic jack and safety stands when lifting or getting under a
vehicle. If you are unsure on where to safety lift your vehicle, refer to its
owners guide. Steering and Suspension components should never be heated with a
torch, bent, or welded. Replacement parts must be direct matches and should be
torqued to specification. The writer of this how to assumes zero liability
in how to use this guide, or any damages that may come from it to you, your
property, or others and others property. If you are uncertain at any point,
refer to a qualified automotive technician.
Inner and outer tie rods are major players in the steering
system. The connect the left and right directional forces of the steering
rack, out to the knuckles and in turn the wheels and tires. Constant
stress, impact and wear eventually cause loose steering, tire wear, drifting and
pulling. Having a vehicle that is lowered also causes some abnormal stress
on these components, and can in turn shorten life. OEM parts on a stock
MKIII should last 80-100k miles.
For a quick primer on steering systems visit -
How Stuff Works.
Never add any type of grease to a sealed joint.
Some aftermarket types may have a grease fitting, if so they are not the
original ones and may be greased. If the boot is torn, I'd just install a
new outer joint, I don't think you can get new boots. The reason why you
should not just shoot grease, or WD-40 into them is because they have a plastic
"socket" that the ball sits in. Adding a petroleum based grease will only
cause the joint to fall apart sooner.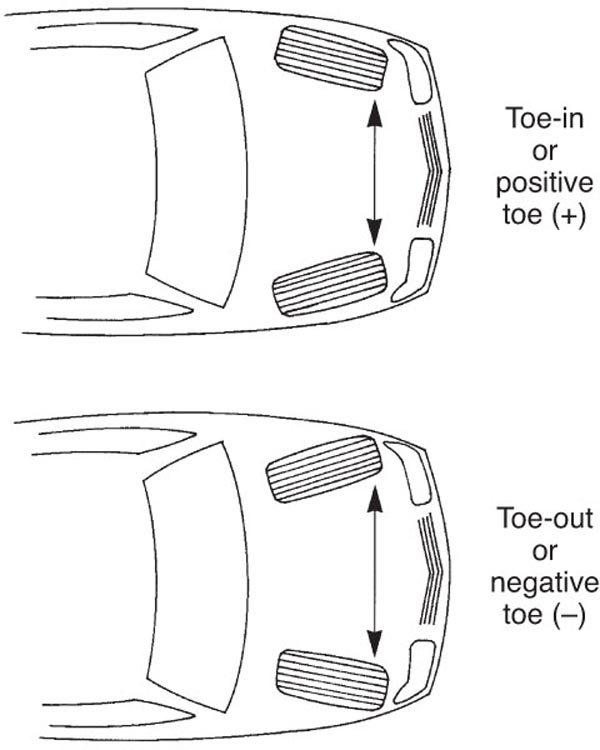
How can I tell its bad? Well, testing for a bad tie
rod is easy.
1 - Noise, if the joint, squeaks or squawks on turns.
2 - The boot is torn open
3 - When you grab the tire/wheel at 9 and 3 o' clock and move it back and forth
(see diagram) and the tie rods have free play...
4 - There is a clunking sound when you have the car parked, and you turn the
steering wheel side to side.
5 - VIDEO LINK
see this by seeing this comparison of two types of inner tie rods.
The MKIII model line has two types of steering racks.
Most 2.0 cars have a TRW design. This rack is on the "base" suspension,
and is seen by having a smooth painted finished. VR6 or "plus" suspension
cars have a ZF design, these cars have an-all aluminum rack that has a "waffle
grid" design. The tie rods for the two types of racks work the same way,
but are not the same. Make sure to check your rack design before you
order parts. There are a few cars out there (from swaps and so on)
with mixed parts. This DIY shows a 2.0 car with a TRW base suspension
rack.
The tie rods (inner) are the same for left/right - the
outers are not, and are stamped with an L or R. L is the drivers side, R
is the passenger. Make sure not to mix them up when installing them.
I prefer to always replace inner and outer joints as sets. Its almost
silly not to. If you replace a bad outer joint, how far away is the inner
joint from failing? Right, you don't know, and if your paying for a proper
alignment, you'll wind up doing the same job twice. So, I prefer to
replace them as sets. And what goes for the left, goes for the right.
This is not NASCAR, your car makes just as many left turns as right ones - so
replace "all four tie rods" and say hello to like new steering.
An alignment is highly recommended after this job.
Only toe is effected, but toe is the major player in eating tires, and crooked
steering wheels. If you do this job carefully, you can get the alignment
close, but its still going to be off. 2 degrees off may not sound like a
lot but it is a major tire wear issue. The MKIII model line wants to see a
toe "that is zero", meaning there should be NO toe in or toe out. The
tie-rods are the point at which all cars with a rack and pinion steering system
have the toe set at.
If there is fluid leaking out of the rack boots - don't
bother with new boots - you have bigger problems - fluid leaks at the rack boots
mean bad news - the rack seals are leaking, and you need to install a new rack.
Installation is not overly difficult, and can be done with
mostly hand tools, with two exceptions. One is a 32mm wrench. A
big-ass open-end 32 mm wrench is needed to remove the inner tie rods.
Another tool, that I prefer is a KD (tool company) 3312 (part number
KD-3312). This is a tie rod remover that slides over the inner rod, and
prevents a TON of hassle. By the book, VW says that the rack has to be
removed in order to get to the inner rods. While, sure, that's nice - its
a TON of extra work, steering column, sub-frame, rack mounts, power steering
lines would all have to come out - bah, we can do it in far less time.
IMHO the only thing this saves you at all is some hassle installing the rack
boots - and I'll show you a trick for that. This is a driveway job, once
your good at these, you can knock them out in 30 min a side. With the
right tools, ALL the work can be done from the wheel well! You don't even
have to really get under the car!
Parts Needed: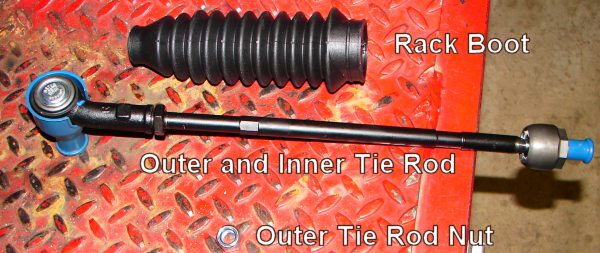
2 Inner Tie Rods
1 Left Outer Tie Rod
1 Right Outer Tie Rod
2 Rack Boots
4 1' long zip ties
2 new outer tie rod nuts
Tools Needed:
32mm Open End Wrench, OR KD tool # 3312
22mm Open End Wrench (two are handy to have)
13mm Open End Wrench
14mm Open End Wrench
17mm deep socket (1/2 drive)
19mm deep socket (3/8 or 1/2 drive)
BFH (Big F**king hammer - I prefer a nice well used 24-48 oz ball peen
hammer)
Torque Wrench that can go down to 25 ft lbs - and up to 81 ft lbs.
1/2" breaker bar. (Long handle)
Consumables:
PB Blaster/CRC Power Lube
Red Locktite
Razor blade.
|
Step 1 - Lift and support the car on
jack stands. Give the car a good shake to make sure its not going to fall
on you when your working on it.
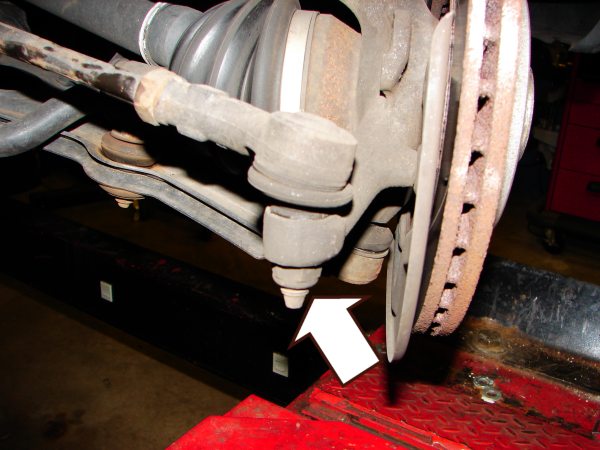
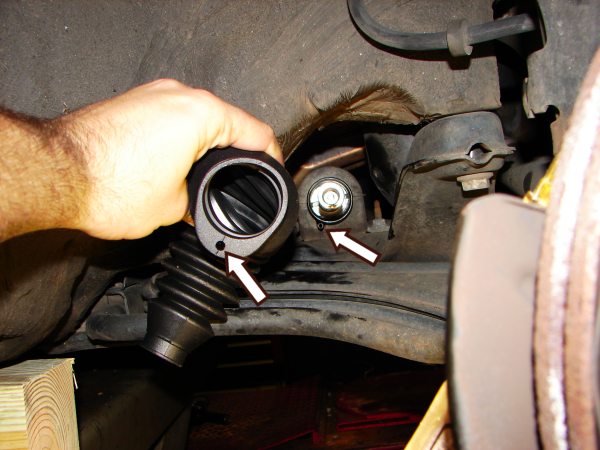
Get out your 19mm deep socket and go to town, take this
nut off. If the nut spins, and wont come off - chances are the out joint
is really worn. In that case try to spray the joint down with PB blaster/CRC
Power Lube, and wait 10 min. Then try it again. If your lucky hand
tools can remove it. If not try air power, or just cut the nut off.
You should have gotten a NEW nut when you got the new outer joint. There
is a 5mm(?) allen opening in the end of the joint - this is worthless, and will
strip out as you look at it. Another option is to cut a slot with a Dremel
in the bottom of the stud, and then hold it with a screw driver as you use an
open-end wrench to take the nut off.
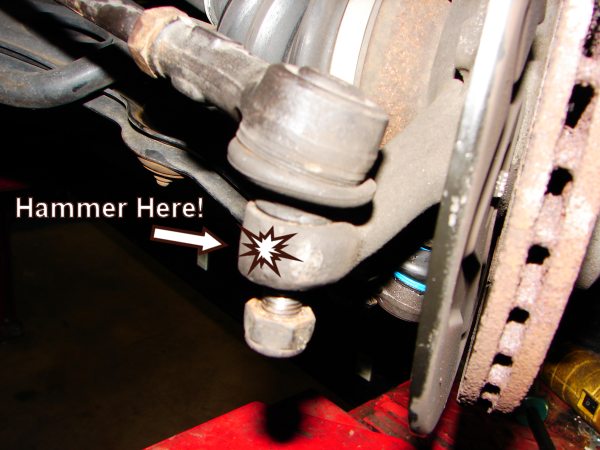
Step 2 - With the nut loose, (but still on the
threads) - hit the steering knuckle with a hammer. Yes, a hammer, and
you'll shock the tie rod free from the knuckle. Forget about hitting it on
the threads, that wont work, and if for some chance, you turn back now, you'll
have ruined the threads and wont be able to steer the car. Forget about
"pickle forks" and presses as well - they are all totally unnecessary. Hit
it hard, your not hugging grandmom. Swing away. 3-4 hits should
shock it free.
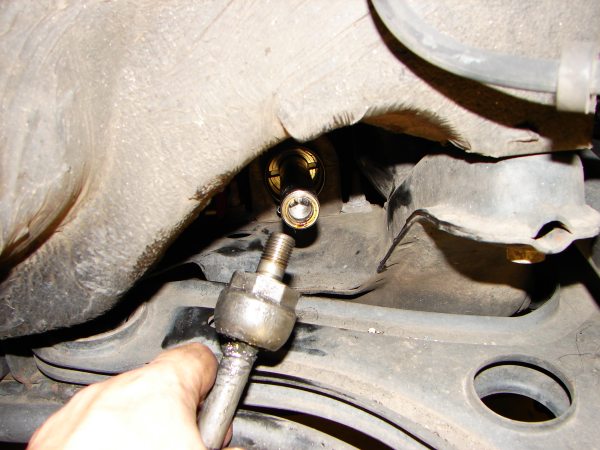
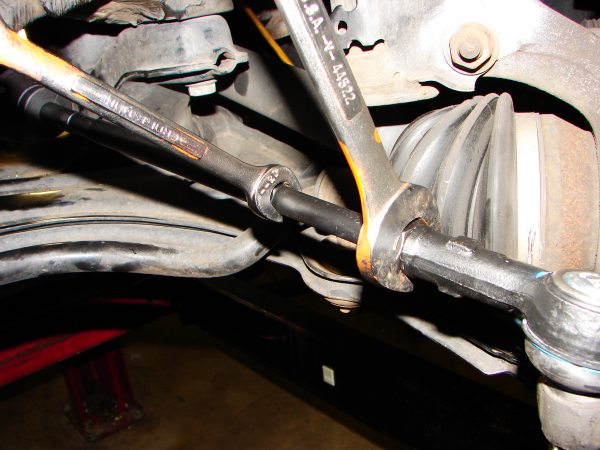
With some PB blaster again, soak down the 22mm jamb
nut on the inner rod. If you can, loosen it and then separate the two (the
inner from the outer). The inner tie rod is a 13mm, and there is a large
flat area on the head of the outer tie rod - that can take another 22mm open end
wrench.
Tech Tip! - Count the number of times you turn
the outer tie rod - in order to remove it - this will get the alignment "close"
to where it was before you took everything apart.
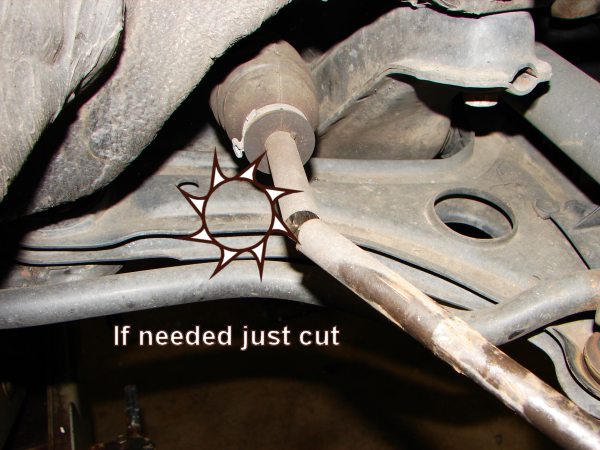
Step 3 - Well, I could not get the jamb nut off for
the life of me, so I just cut the inner rod - who cares, it was the cause of the
problem to begin with.
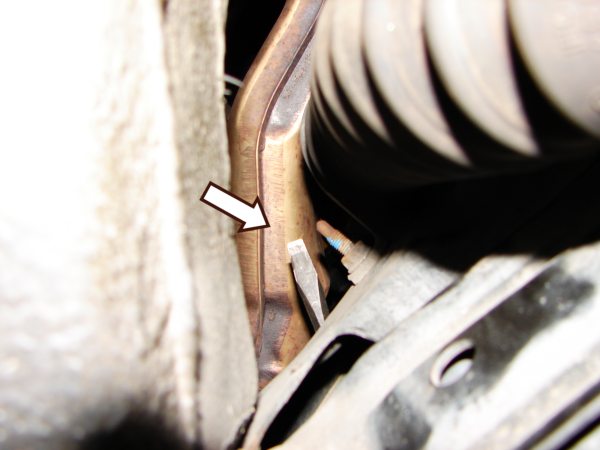
Step 4 - Off with the clamps. The OEM style
rack boots are held on with a metal clamp system that is identical to a CV joint
clamp. A special tool is used to install these clamps, and well, zip ties
work fine here... so pry, twist, cut (with wire cutters) off the old metal
clamps and chuck them. The picture below just shows you how you really
cant get to the clamps too well with a screwdriver from the direction shown.
I prefer to attack the clamps from the wheel wheel area of the car - I use a
long prybar and a hammer and just knock them loose. Forget about hurting
the boot, we got a new one.
And.. its off!
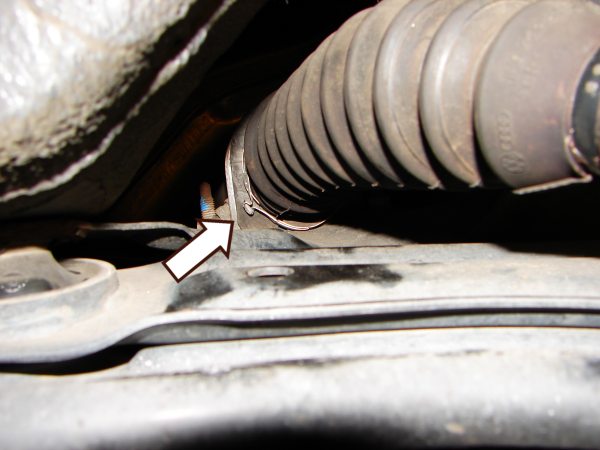
Be careful, they can be sharp and pokey.
Remember! If there is fluid leaking out
of the rack boots you have bigger problems - fluid leaks at the rack boots mean
bad news - the rack seals are leaking, and you need to install a new rack.
No over the counter "sealer" or other crud is going to help at all - get a new
rack, and use the OEM fluid!
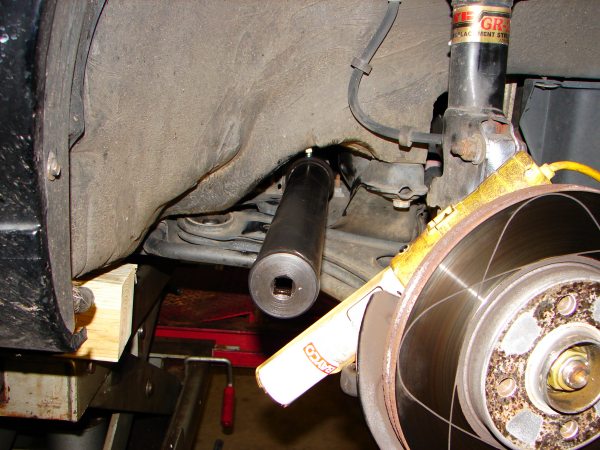
Step 5 - Yank off the boot and turn the steering
wheel so you can access the flats on the inner joint when your big ass 32mm open
end wrench can fit in-between the subframe and control arm. From here, you
can turn the joint off - but I hate this way. It takes too damn long.
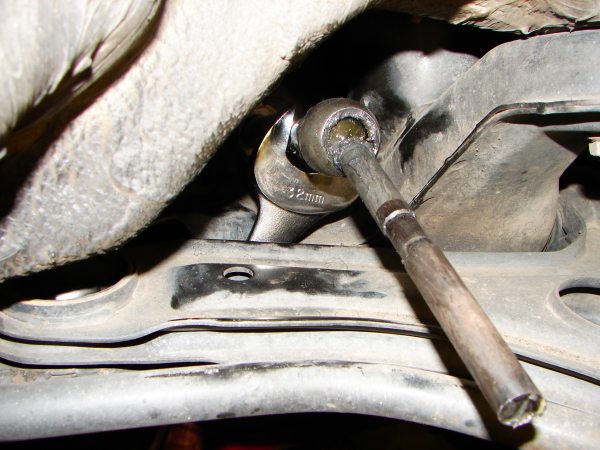
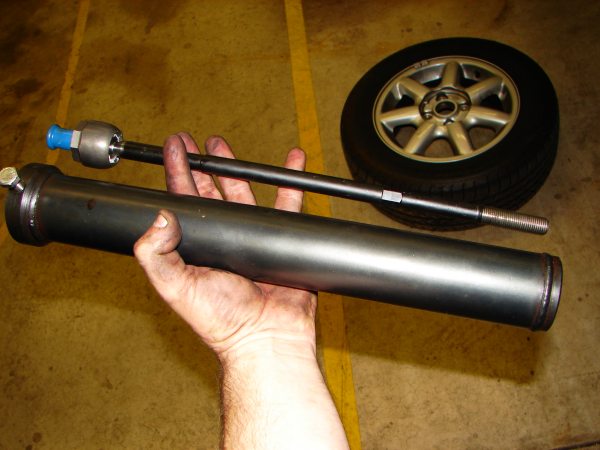
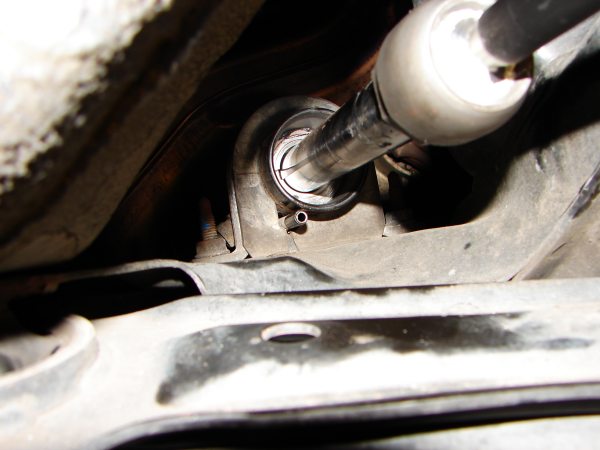
I Prefer the KD 3312 tool.
This handy unit shown below fits over the inner rod, and then has a 1/2" breaker
bar, ratchet, or torque wrench, and makes life as easy as cake.
The small bolt on the end holds the inner joint flat
(where the 32mm wrench would go) in a stable position so you can unbolt and bolt
in the new inner tie rod with just a few turns. Righty tighty-lefty loosey.
These are not reverse threads.
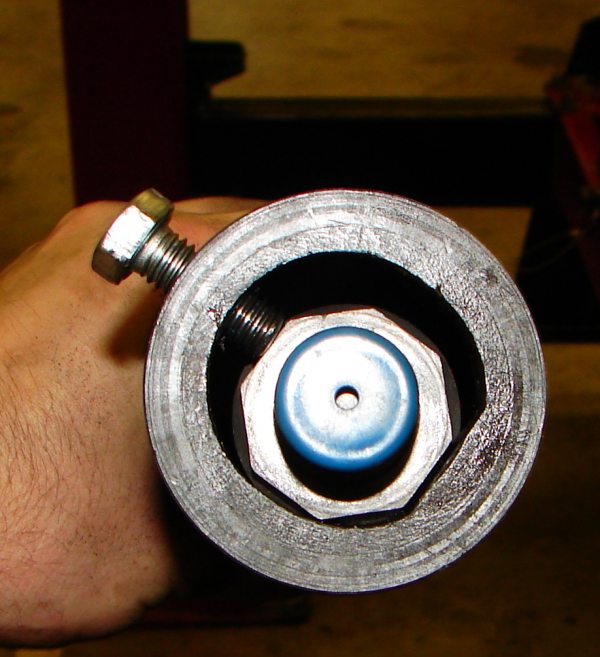
Install it as shown, and snug the bolt down with a 14mm
open end wrench.
Step 6 - Done, The inner rod is removed, and
you can see it just has threads that hold it in place. No special locks or
seals are used here.
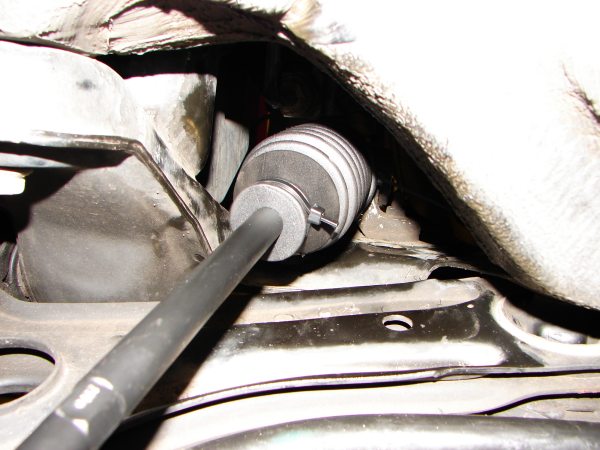
Getting the new boots ready - Note, there is a breather
hole, and cross over tube as part of the racks boot system. This breather
tube is needed since the rack is sealed from the outside. The rack
boots are like bellows and breath into each other. The cross over tube
allows air to flow in and out of each bellow and keeps the system sealed without
popping off the bellows. Getting the boots back on, can be a pain in the
ass - making sure they are fully seated, and lined up is the hardest part, but I
have some tricks.
Getting the boots on is critical to the life of the rack
seals. If dirt, water, rust, moisture or anything gets on the rack here -
you'll have major issues here. The rack seals will become damaged and then
you'll leak fluid out of the rack. And - that means you replace the rack.
Its that simple. So unless you feel like shelling out a ton of money, and
time, and doing the job again - make sure the rack boots are on right.
Paint with white paint, a line down the boot so you can
make a mental note of where the hole is.

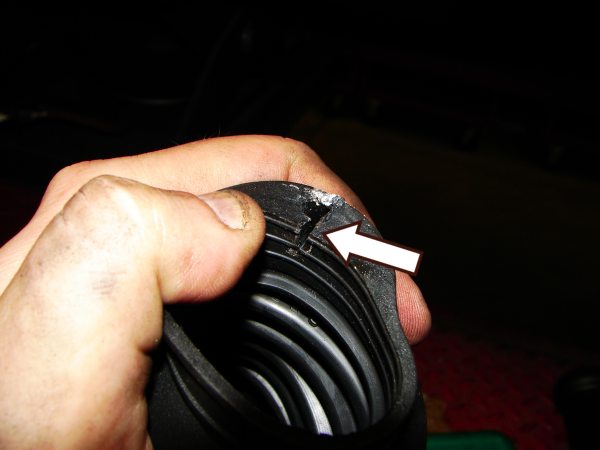
And cut, a small slit on the INSIDE of the boot.
This will save you a long time of trial and error with your hands in a small
confined space with the control arms digging into you hands... The small
slit allows the breather tube to line up with the boot and just makes it a
thousand times easier and still keeps the system sealed and safe.
Step 7 - Install the new inner tie-rod. I prefer to
add a dab of red locktite on the threads of
the new inner rod where its going to mate to the rack. Carefully thread
the inner rod onto the rack, and then torque it down to 59 Ft Lbs.
THIS TORQUE IS CRITICAL! IF THE INNER JOINT COMES
LOOSE FROM THE RACK YOU WILL LOOSE STEERING CONTROL.
Note, just something interesting on the drivers side:
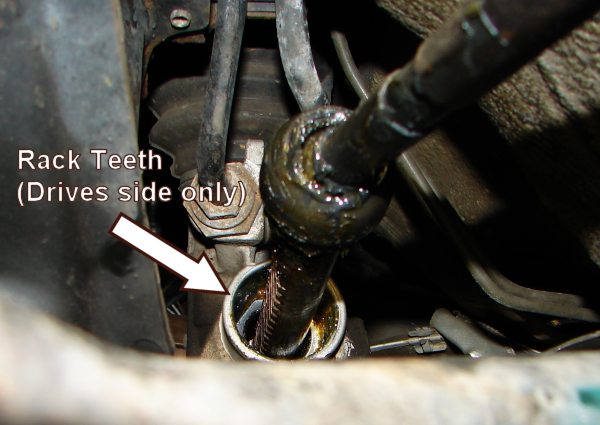
They are the rack teeth of the "Rack and pinion".
Don't worry, your supposed to see grease here, this is not a fluid leak!
Step 8 - Install and line up the new rack boot.
Install the new outer tie-rod onto the new inner one... counting the turns.
Don't forget the jamb nut goes onto the inner joint
BEFORE you install the outer joint!
Did you install the boot? Did you
install the jamb nut?
Did you?
Sure?
Go look again.
Step 9 - With all the parts lined up snug down the
jamb nut against the outer tie rod end.
Step 10 - Install a new zip tie to both ends of the
boot. Its tricky, but try to get them snug. Snip off the excess.
Install the lower outer tie-rod nut (the one we removed
in step 1), tighten that down to 26 ft lbs.
Reinstall the wheels and torque the wheel bolts to 81
ft lbs.
Review the
Pre-alignment tips.
Step 11 - Get a perfect alignment. And enjoy
a car that steers like new again!

Home