
How (not) to repaint a Westy Top. (Let it all Load..)
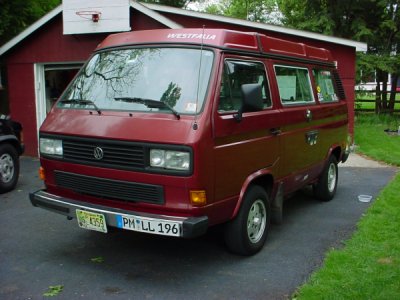
Before (Cool! White Walls BLETCH!!!!) After
One of the more common issues I see with Vanagon campers is the fading of the Westy top. After doing several head scratches and Google searches I found an overall lack of good data on how to tackle such a job. Well, let me say this, I found no data on how to do it *cheaply* and *fast*.
Be forewarned, this article will go against every body shop rule of quality workmanship. However, the end result was (and still is) quite stunning given the cost and time involved.
However I was amazed (as well as everyone else!) just how much a clean looking top changed the whole look of the van. It went from “beater” to “nice” in 24 hours. To do this right you’ll want 48 hours of dry sunny warm weather on hand.
Step 1 – Observe the issue at hand. How faded is the top? Has it ever been repainted before, and if so with what? Has it been damaged? What about the decals? Is it just dirty? What shape is the rubber in? Get a step ladder and check it out.
My Titan red top was beat. While the van is still very “red” the top was almost identical to a red printer dull clay color. There was a nice layer of thin green algae on the center sections. I had a few things against me as well. The PO had “glued” the rubber trim around the perimeter of the top back up with some awful-super strong fiberglass “patch”. It looked like crap, was gray, and done poorly. The factory rubber had a metal (steel, duh..) channel that clamps to the lip of the top. The metal had rotted away and so the rubber fell off – that’s where the glue came in to play. My decals were faded and shrank. If I was going to paint, they had to come off..

Dull, super dull.
Step 2 – Clean and Prep. You’ll need a shady place, a hose, a bucket, car-wash soap, WD-40, Heat gun, Palm Sander (optional), Goof-Off <tm>, Rags, 3 Hours.
So I cleaned the top first, I used a heat gun to soften the old decals. The top of the Westy is made out of some super durable resin, and I was suspired at how WELL it withstood heat. I used a wooden stick (paint stirrer) to scrape off the decals. Once they were off, I sprayed WD-40 on the surface (several times) to get the gunk off that was left behind. You can see how much the top faded. (Side note of interest, the color “red” is IDENTICAL to most “red” primers!).
I had to use a grinder to get off the fiberglass "glue" from the PO. Tuck in the tent fabric, and I used 3M “Blue Masking Tape” to cover areas that I didn’t want to get debris into. I just ripped off of the old rubber around the pop-top. It fell right off, and we’ll talk about the luggage rack later..

before grinding, note how the trim is falling off - the gray stuff is the "glue", after the white base of the top is visible. I had to grind to get the "glue" off the top.
I then washed the top with soap and water; I used car-wash liquid and Fantastic/409 to clean the algae off. I also used a soft scrub brush to scrub the top. Take care NOT TO LET THE SOAP DRY ON ANY SURFACES! If it does dry paint damage can result, and if you can, do this in the shade.
Oh, I also stripped off the gutter rail trim. It was cracked, I used self adhesive door-trim (in a 40' roll) from JC Whitney. Perfect Fit and finish.
Hose everything off, and then wash the entire van top to bottom with the car-wash soap. Wash off the entire van, it will help the tape stick better (see next page). Let it dry you’re done for today.
Next morning, - I broke EVERY rule in painting. I painted outside, on a humid windy day, with lots of bugs, pollen, and direct sunlight. I found that the dull top finish was *perfect* for getting paint to stick. No sanding here! The natural top texture covers a lot of beatings.
WIPE DOWN THE WHOLE TOP WITH THE GOOF-OFF!
Tape up everything you don’t want to get paint on. I like the 3M “Blue” painters tape. Home Depot sells it in various sizes. Avoid the “Duck” brand “Pink” tape - its too loose for this job and does not handle wind well at all.
Get some news papers; cover up the upper half of the van.
Make sure you stuff paper into the cracks of the top and the canvass. The paint will not come off the canvass.
Oh! The tippy top! Phht, forget it, who cares!? You can’t see it when the top is down anyhow. I used the tape to make some straight lines about 3” in from the top “curve” on the outer edges. Thus I have a big “unpainted section” in the middle of the top. Like I said, this is a budget job. Park that side toward some trees when you camp.
Paint in sections; carefully shake the cans to make sure they will blend. Test spray the can to make sure it’s the right color and shade before it hits the van.
I did 3 nice coats on each section. Follow the directions on the can and let the paint sit for about 15 min between coats. Humidity and colder temps increase the drying time. Even though it was humid, it was warm and sunny. Paint was dry to the touch in 12 hours, and hard in 48 hours.


My super Tape Job.


Note the crap on the ground. Sends shivers down the spine of most body men..

You can see the front and the back - and the difference between the dullness and the hot redness. At this point I knew I was doing things right.
The Luggage Rack
Remove the front luggage rack, ewww! 15 years of rotted leaves and gook! This also gives you a chance to take the rack and work somewhere else (in the shade) to remove the old Westy logo.
To remove the top, undo the 4 screws around the rack, and then undo the 4 bolts with the top up. Take care not to loose or damage the “nut covers” as these (I think) help keep the front tent fabric from rubbing against the sharper nuts and bolts on the rear of the rack.


I was lucky and the nuts didn’t fall into the van while I was working on it. If they do add some dumb-dumb (black caulk stripping) to them to hold them in place while you put the rack back on. (See the hacks section for a cool tip!!)
I did the rack install and removal with 1 person - me. But I am tall, and two people might get the job done better.
I used 1 full can on the front rack. I sprayed it on a table in the garage, oh yea, don’t forget to spray the exposed 4 screw heads too. When you put them back on, cover the tip of your screwdriver with electrical tape to protect the paint.
The paint you see was my “test” patch that I just sprayed on there - to see that it would stick and hold up. That was months ago, and I knew it was cool… Keep a tab on the rubber insulators on the insides of the rack - they tend of pop off while your not looking.

Don’t fret about the lowest edge, remember this gets covered up by trim. Go Westy has some stuff that seems to be better quality than stock. I had some stuff for the front rack from www.poptops.com that I was not as happy with once I saw the GoWesty stuff. I didn’t replace the “center lip” that covers the rack and pop-top - mine was ok, so I just did the pop-top and the rack. Use a soft mallet to fully seat the trim in place once the paint is dry.

 Wow! Look at the edge! (Note the gutter trim)
 No Decal
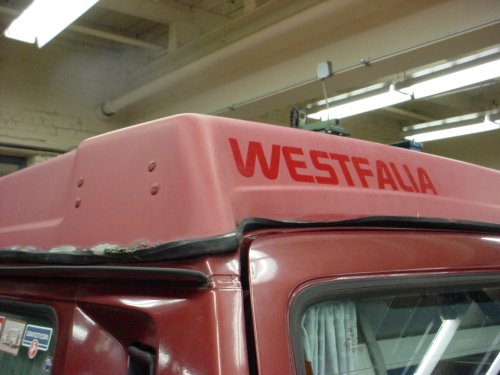
A days later I got my Westy decals from some dude on E-bay, they are decent quality. I tried real hard to locate the original mate-marks left by the original decals. I came close.
 Decal!
Sweet!