Again, the machine does not need electrical power to operate, but it does "bring the machine to life" and make game play a little more exciting.
copyright (C) Dan Reed
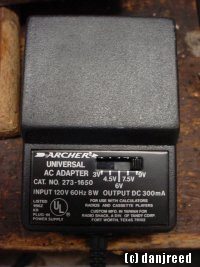
The power source can be… well just about anything below 12 volts! The voltage for the machines is 10 Volts (AC or DC), at about 500 ma. You can use a big 6 volt lantern battery (it will run the lamps fine), or go to Radio Shack and get a transformer. I would really suggest taking a transformer from something like an old cordless phone, answering machine, or small appliance. As long as the voltage is within 12 to 9 volts, an at least 300 ma, the lamps should work if they are the original 10 volt ones.
Since the machine can run on AC or DC, polarity does not matter, however, DC is slightly "nicer" to the bulbs and they should last longer on DC than AC. If you are really concerned about keeping the machine's original bulbs alive - run the machine at 9 volts DC. This will put the least strain on the lamps and make them last for a very long time. Two 9 volts in parallel should do the trick. Or you could use 4 AA, C, or D cells in series to get the job done.
The yellow splice you see on the left (Yellow, White, Orange) on the power hookup picture, was for a central light board that the pachinko parlor manager would use to keep track of when a machine ran out of balls. That yellow splice was to cause the "ball empty" switch to also light up an indicator on his board, telling him that the machine was out of service.
The fuse is an older cartridge style 1.5 amp rating, a 12-volt fuse will do. Frankly the current is so low, for testing purposes to get the lights and wires right, jump it with a paper clip or a jumper wire (just be careful!). If needed any auto parts store should have them in stock. With voltages and amperages this low, there is no risk of fire or electrical shock.
There is no reason really to keep the 10-volt bulbs. If one or more are burned out, or broken you could replace them with another screw in style. Just make sure they are all the same voltage and then change the power supply as needed. Heck, you could even make the lights be "Jumbo Super Bright LEDs" and run the entire game on 1 AA battery! There is a parts list, with Radio Shack part numbers on the Where to get parts, machines, and balls page..
Below are some schematics that I got from another web site, I cleaned them up a bit. The wires look like 14 to 18 gauge. A soldering iron, and 12-volt test, jumper wires are good tools to have if your lights and switches not work.
| Special Thanks to David from Classic Plastic.net for cleaning up these wire diagrams! |
The only switch I found to be a problem was the "Winner" switch. It has two long brass contacts with small contact pads. I had to clean the pads with some light grade sandpaper, and then re-adjust the contacts as shown. TV Tuner, Contact Cleaner (Radio Shack) also works well.
copyright (C) Dan Reed

Typical Transformer
copyright (C) Dan Reed

The Electrical Hookup and Fuse Assy. - Picture of electrical hookup for the Nishijin 3 light model.

Switch for "Winning Ball Tray - Empty" Light
copyright (C) Dan Reed