
The Great MKIII Jetta Golf 2.0 ABA Timing Belt and full water pump page. (Updated yet again 7/17/08)
If you are reading this, and have no idea about the cooling system or how to adjust the power steering belt, or VWs in general - GO READ THIS.
|
This "how to" assumes you have some basic tools, and safety gear. Safety glasses should be worn at all times when working with tools and automotive fluids. Always use a hydraulic jack and safety stands when lifting or getting under a vehicle. If you are unsure on where to safety lift your vehicle, refer to its owners guide. Hot boiling coolant will cause severe burns, and coolant is toxic when ingested. The writer of this how to assumes zero liability in how to use this guide, or any damages that may come from it to you, your property, or others and others property. If you are uncertain at any point, refer to a qualified automotive technician. Dispose of all waste materials based on your local laws. AT NO TIME SHOULD A HOT PRESSURIZED COOLING SYSTEM BE OPENED! |
Why do this:
The VW ABA 2.0 Gas engine is robust, thrifty, slow, yet very trust worthy. However, as time marches on, the timing belt could break, and this leaves the engine dead and lifeless. Worse yet, there is a chance that it could damage the head of the engine and lead to a much larger repair cost. While the factory owners manual gives NO indication that the belt should ever be changed, its a good idea to replace it every 5 years or 90,000 miles. Good news is, its one of the easiest timing belts to change, and can be done so with a few hands tools. No "special" VW tools are needed for this job in any way.
The water pump is often changed at the same time on most cars "since your down there". On the 2.0 engine (much like the older 1.8 and 1.6s of the past) the water pump comes in two parts - the main pump body, and then an extension housing that also houses the thermostat. Back in this page you'll remember that I broke one of the mounting flanges for my thermostat. Well, its started to leak, and needless to say, I hate to drive a car that pee's coolant when its turned off. So I decided to replace the entire pump and housing.
Water pumps can last a very long time as long as the cooling system is maintained and the belt is not too tight. I'd replace them at every other timing belt job. They are not known to leak often. But it is a wear item. My car had 123,000 miles when I did this one, so I felt I got my money's worth out of it. The timing belt had been done once (at some unknown interval) by the previous owner. I felt better about doing it myself and knowing it was done right.
The job of the 2.0 water pump and timing belt is not hard. But there are a few tricks, that I hope I can share to help make your job easier.
 If
your car is 1996 or newer, you'll have an air (smog) pump to deal with, as
well as a "new style" (thermo) timing belt tensioner. Most people
including myself don't like the new tensioner. Its more prone to
failure then the older
style unit. Its a common upgrade to throw the "new style" (thermo)
unit in the trash,
and get a new stud, bolt, and tensioner - just like the "old" models.
I'd suggest you do this, its much easier to work with. If
your car is 1996 or newer, you'll have an air (smog) pump to deal with, as
well as a "new style" (thermo) timing belt tensioner. Most people
including myself don't like the new tensioner. Its more prone to
failure then the older
style unit. Its a common upgrade to throw the "new style" (thermo)
unit in the trash,
and get a new stud, bolt, and tensioner - just like the "old" models.
I'd suggest you do this, its much easier to work with.The next week I did my Wife's 1998 car, and I changed it over. Later in this DIY I point out a few things that pertain to this simple change.
|
How long this takes:
Well, its not something I'd want to have to finish up in a hurry. With a few breaks for beer, and lunch, it took me 5 hours. Keep in mind, I was not gunning flat rate, and it was a nice lazy Sunday job.
I have to take off the air conditioner right?
Wrong, while you move it off its bracket, the system stays sealed and charged.
Wow, this is really expensive at a shop to get done.
I got all the parts shown below (minus coolant, I had some G11 on hand) for $100 from GermanAutoParts.Com. Current labor time guides show a water pump as 3.4 hours work and timing belt shows 1.9 hours labor. Take that times $70 per hour and your at $371 for labor *minus* the cost of parts. For the hell of it, I went to a local chain store and asked them to quote me the parts I got from GAP, they came to a grand total of $250. Thus, sure at a shop this job could go into the $700 range easy and none of it is that hard to do. And none of the chain store parts were German.
My belt broke while I was driving.
Well, you still need to install a new timing belt and tensioner. My advice is to do this 1st, then run a compression test to make sure no valves were bent. Again, I've seen arguments that the 2.0 ABA engine is an interference engine, and others say the belt broke and nothing bad happened at all.
Does the timing need to be adjusted, I see a bolt on the distributor. I need a timing light right?
No. Do not touch the distributor. Timing is controlled by the ECU, and relies on the stock location of the distributor. If your car runs poor, or has a CEL (Check Engine Light) on after you did a belt. Your timing was screwed up. Take everything back off, and check it again.
Do I have to do the timing belt and the water pump at the same time?
No. The belt is easy. The pump is a little more work. The only two steps they share are really the main belts.
Tools Needed:
Pliers,
Optional - But Recommended - Spring Clamp Pliers (shown to the right) Two gallons of coolant, two gallons of distilled
water. Its a very good idea to replace the tensioner. (Note - OBDI The older cars had a smaller stud and tensioner. The newer design is a bit larger. The length of the stud is the same, but the diameter is larger but all places just sell the larger stud now. Make sure you get a new stud, nut and washer) Optional Stuff: ottermaki (12:31 AM 10-31-2006): Hey
Dan, |
Step 1 - Lift car, Remove Passenger Side wheel/tire assy and inner splash guard. The splash guard is held on with two small spring nuts.. just use a screw driver to pop it off. This way you can get to the belts. Yes, I have a jack stand just to the right of the floor jack.
Step 2 - Yank battery cable, since we will be removing the alternator from its brackets, its got battery power running to the back of it, so in order to prevent a fire. Unhook the negative terminal

Step 3 - Under the car, unclip the lower main hose to the water pump. Take off the coolant bottle cap. Use a pan to catch the 2 gallon spill about to come out when you pop off that lower hose. Let the coolant drain while you do other work.

Step 4 - Remove the air box (air filter). You'll see there are two rubber bands that hold the lower part of the box in. Unplug and mark the vacuum lines to the box. Press the two metal clips on the side of the MAF sensor plug to pop it off. This way you have more room to work.

Step 5 - For now, leave the P/S W/P belt on the vehicle, and remove the main serpentine belt.
Slip a 13 mm long handle wrench on the end of the tensioner bolt and rotate it to the front of the vehicle. This will release the tensioner spring. Move the belt, and then slowly swing the tensioner back to its full rest position. Use the wrench as a lever, not as a tool to "take bolts off". Rotate the wrench in the direction of the arrow shown.

 Note:
If you are just doing a timing belt, and not the water pump at this
time. - Take off the 13mm bolt that holds the tensioner to the spring
arm. This will enable you a little more room, and allow you to get to
a "hidden" bolt for the timing belt cover. (Later job picture shown
below, from an OBDII car..) Note:
If you are just doing a timing belt, and not the water pump at this
time. - Take off the 13mm bolt that holds the tensioner to the spring
arm. This will enable you a little more room, and allow you to get to
a "hidden" bolt for the timing belt cover. (Later job picture shown
below, from an OBDII car..)Also remove the water pump pulley, you'll need to do this to clear the lower belt cover. |
Step 6 - Hop down under the car. And loosen the 4 Allen bolts on the crank pulley, and the 3 bolts on the water pump pulley. You might find the engine turn over... if it does.. the bolts might be stuck. If they are stuck, you can try to hold the center crank bolt with the 19mm (or 3/4") 12 pt socket and the 1/2" breaker bar. You'll get them loose.
NOTE: DO NOT REMOVE THE CENTER CRANK BOLT! IT IS A STRETCH BOLT AND MUST BE REPLACED IF IT REMOVED! I HAVE SEEN HORROR STORIES ONLINE ABOUT BROKEN BOLTS AND CRANKS DUE TO THIS ISSUE!
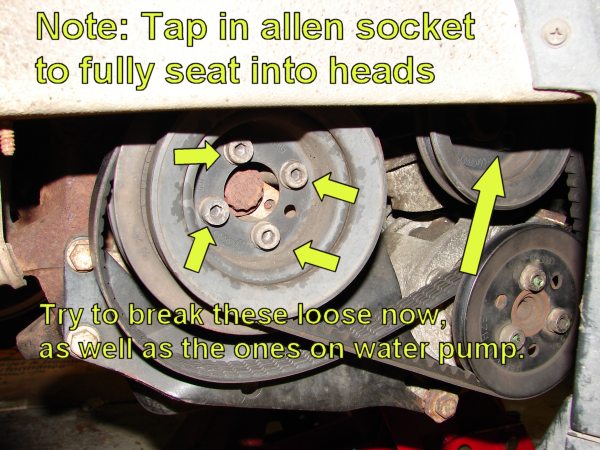
Update: Summer 2007 - At this point I've done, like 6 timing belts for people. I learned 2 tricks. If the 4 bolts are playing hardball, are rusted or strip out. I got two options.
1 - Get a bolt out set, I used an Irwin set. The 1/2 size just fits over the head of the Allen screws. I got it off with ease.


2 - Take your 8mm triple drive square axle tool (a VW tool, you gotta love it) and just pound that sucker in there.
Step 7 - Remove the alternator by removing its two mounting bolts. Don't bother to unhook anything on the back of the alternator since you do have to.

Step 8 - Once the alternator is off its mounts. Flop it over onto the upper rad hose. It will be out the way. Soak a little PB Blaster onto the bushings.. you'll want to lightly tap these back (if you can) to aid in reinstalling the alternator, but le them soak for now.

Step 9 - Loosen and remove the air conditioner compressor. There are two bolts DO NOT UNHOOK ANY AIR CONDITION LINES! THE SYSTEM DOES NOT NEED TO BE EMPTIED AND REFILLED!
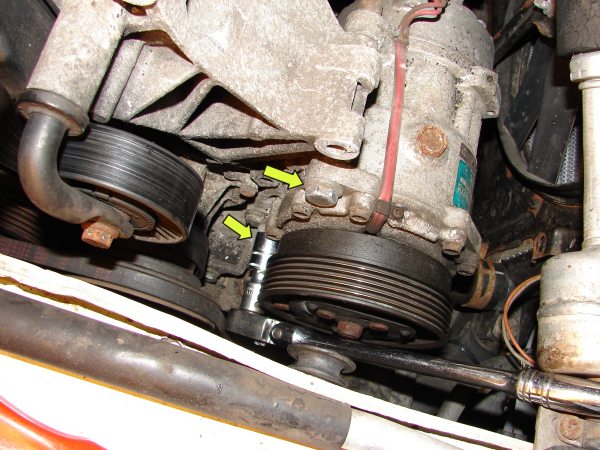
The bolts are quite long, and the lower one comes out fine. The upper one needs some coaxing and wiggle from the compressor.

I used a small pry bar to help free the compressor from its mounting. Be careful! Don't over pry! You'll shatter the case of the compressor!! Once the compressor comes free you can wiggle that longer bolt out of the top.

Once its free, use a hammer and punch (brass) to hammer that bushing back. This will make putting this back on 10x easier then it was getting it off. The compressor can lay down in front of the engine bay, on the lower radiator hose.
Step 10 - Ok, great! At this point there are a total of 4 nuts, and 1 bolt that hold the tensioner bracket in place onto the water pump.
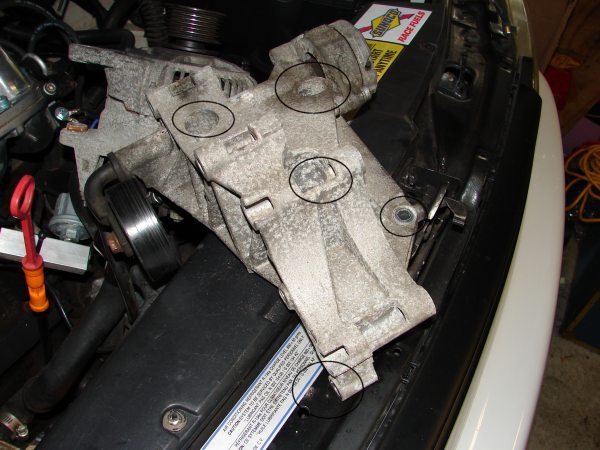
Here I already took it off the block, but I circled where you need to go. A magnet on a stick is handy for getting the little nuts in and out down there..
Step 11 - Here you can see the 4 studs that hold the water pump on. Bentley says that these are a 1 time use units. I didn't know this, so I reused them. But you may wish to have new ones on hand. I could not find them online. SEE STEP 26 ABOUT THESE BOLTS!

Of course, take off the coolant lines at the rear of the pump.
Once the pump is off:

And the pump:

Step 12 - Have a quality beer. Sit back, and enjoy it. Kids, if your under 21 - have a Coke.. or whatever..

Step 13 - Take a look at the new VS old pumps:

The older OEM pump has a plastic impeller VS a metal one. Word on the street is that the plastic one can sheer off and become worthless. Also the little arrow is where I cracked my old one back here.
Install the new T-stat (and gasket!) onto the new pump housing, this gets torqued to 89 in lbs.

Tip - I added a little RTV to the bolts on the pump's backside, and where the threads extend out from the T-stat housing. The idea is that it helps prevent corrosion into the threads, and prevents broken bolts down the road.

At this point also transfer over the water pump pulley, and torque it to 15 ft lbs. If needed mount the pump pulley in a vice with some blocks of wood to hold it. Don't crush it!
Step 14 - Using a razor blade, wire brush or gasket scraper, clean the blocks water inlet. And clean it off with some brake clean.

Take this time to also remove the belts from the engine (I cut mine off) but if you want to do it now, since the A/C compressor is out of the way, its a prime time to loosen the power steering pump bracket so it can be adjusted.
Step 15 - Ok, forget all about that water pump stuff for now. We are going to move onto the timing belt area.

Remove the intake elbow and its lines from the PCV breather.
Unclip the two clips at the ends of the upper belt cover. Unhook the fuel lines from their clips (no need to pull them off the fuel rail!)
At this point slide the upper belt cover up and lay it aside. For another view of how to do this job - visit http://www.vwenthusiast.com/technical/TimingBelt/timingbelt.html
Step 16 - Go down below again and rotate the engine until you can see the upper belt timing mark.

Remove the 4 Allen bolts on the crank pulley . Again - NOTE: DO NOT REMOVE THE CENTER CRANK BOLT! IT IS A STRETCH BOLT AND MUST BE REPLACED IF IT REMOVED! I HAVE SEEN HORROR STORIES ONLINE ABOUT BROKEN BOLTS AND CRANKS DUE TO THIS ISSUE!

The crank pulley will be stuck on. I used a long pry bar to gently "coax" the pulley off the crank. I would pry, then rotate the crank 1/4 turn and pry again. It came off easy this way. Don't pry too hard, you don't want to break anything you are prying against, and mar the pulley.

Once the pulley is off, this is what you see. Take out the rest of the bolts for the lower cover and then set it aside.

There it is. Before you go and say "gee, that looks hard", let me tell you, there is no engine easier to time then this one.
Step 17 - Rotate the lower crank bolt until you see the timing mark on the upper cam sprocket.

I marked mine with paint on the cam sprocket so its easier to see.

Step 18 - I also marked the lower crank sprocket and intermediate shaft (this shaft runs the distributor and rotor). The Bentley manual shows this picture, which is showing the hole from the green plug on the trans case. I prefer to just make my own damn marks at this point. This way I am not running back and forth all over the engine bay.


And if you want, pop off the dist cap, and verify its pointed at cylinder number 1. The rotor should be parallel with the hall sender plug socket (the connector). - IMPORTANT NOTE! READ THIS! I show the crank set at its 6 degree BTDC mark! The bolt holes would normally be at the 12, 3, 6, and 9 o'clock position.


 There is a small slot under the cap of the
distributor, TDC Cylinder #1 lines up with this mark,
There is a small slot under the cap of the
distributor, TDC Cylinder #1 lines up with this mark,
 (Picture taken on a slight angle..)
Pictures of the timing marks on the flywheel, to view these remove the green cover plug on the trans axle, many thanks to the people (Travis and Broke) who lent me these pictures; You want to shoot for the TDC or "0" mark. Many people are confused by the lines on the flywheel and in turn set the timing wrong with the belt.


note, here you can see the "o", and the timing mark is pointed to the 6deg before TDC mark.
When you set up the belt set it to the "o" mark!
Stud Install Notes: If your changing over from the Thermo Tensioner:

Remove the two 10mm bolts, and the center nut from the tensioner.
Throw it in the trash, never to been seen again. I can tell you why these cause more engine failure rates then the old style tensioner. Pull up a chair, this tensioner style is slightly smaller then the older style: see below.

The fact is, even when its LOOSE the old style tensioner STILL has enough TENSION on it that it can hold and run the belt.. Really! The new style is SMALLER then the old style. Thus when its loose, the belt can *slip off!* If this thing gets stuck when its cold, and then does not expand as it warms up, bingo - the belt falls off!
Remove the existing stud:

And then use two nuts, as a jab nut against each other.

And install it - larger thread end into the block 1st.

Now, follow on your merry way...
Step 19 - Note the tensioner position, and then remove the 13mm nut that holds it on. CAREFULLY slide it AND the belt off. Make sure not to turn or bump any of the sprockets!

Step 20 - Verify your marks, and then lay the new belt onto the sprockets. Use two spring clamps to hold the belt onto the cam and intermediate sprockets. Pull it tight.. so there is no slack there, but not so tight as to move the sprockets. This part is critical since it times the cam and distributor. The spring clamps are nice since they prevent the belt from falling off, and the timing to change as you go onto the next step.

VERIFY your marks again!
| A few notes on
timing belts. Never: Reuse a belt, Crimp or fold a belt, Use a belt that shows signs of being contaminated with oil, Run a belt with a known oil leak from the cam or crank.
|
Step 21 - Install the rest of the belt, and tensioner. You'll have to slip on the tensioner at the same time you install the belt and slip it around the crank sprocket. Its tight, but do NOT use something to stretch or "pry" the belt onto the crank sprocket!!

Step 22 - Once the belt is on, again, check your
marks for movement. I used a pair of bent/angle small pliers to fit into
the tensioner holes to get the belt tight. Bentley says that the belt
should flex no more than 90 degrees on its longest span. I hate this
method, since its all about how strong your fingers are. But I went with
it. Torque the tensioner nut down to 33 Ft Lbs once its where it needs to
be.

Step 23 - Rotate the engine by hand TWICE and verify all marks are still aligned.
About timing marks, Bentley says you can be up to 1/2 a tooth off, after a belt adjustment, and that this is normal. Again the distributor should adapt to this minor change.

Step 24 - Have another beer. Really. At this point, its all about going back together.
Step 25 - Put the lower t-belt cover back on, and
the upper one back on, install the intake elbow, MAF, grounds, dist cap,
crank pulley (the Allen bolts get torqued to 15 Ft/Lbs.).. and...
RUN the engine! Yes, at this
point just turn it over and rev it a little to make sure the belt does not flop
off (it wont), and that the car runs as it should. If your CEL is on, or
the car seems to bog down, your off a tooth on the timing somewhere. Don't
run the car too long, remember, your car has no coolant, A/C, power steering or
alternator! Also beware that the dumb factory alarm is going to go off
when you hook the battery back up.

It runs! Yey!
NOTE: If the CEL comes on over 3000 PRM, double check your timing marks. This is often a CAM sensor code. And it usually means the belts timing is off a tooth or two.
Step 26 - Install the water pump back in its place. Again the Allen bolts on the water pump pulley get torqued to 15 Ft Lbs.

NOTE: These 4 bolts are "stretch bolts" meaning they are one time use. I did NOT turn mine an "extra 90". I just torqued them down to 20 Ft/Lbs. I've one e-mail from a guy who broke one of them off in the block from turning them too much. JUST BE CAREFUL! PART NUMBERS FOR THESE BOLTS ARE AT THE TOP OF THIS DIY. FWIW, MOST DEALERS DON'T REPLACE THEM EITHER....
The 4 bolts that hold it in place get torqued to 15 Ft
Lbs, plus 1/4 turn.

Step 27 - Install the coolant lines to the pump, and start to fill the cooling system as you install the tensioner bracket, A/C pump, and alternator. Keep an eye on the coolant. And make sure none is leaking.. now is a better time to find out then later. Keep filling the system as you work.

I found it easy to use a small punch to help line up and "coax" the alternator back into place.

Install your new belts, put your wheel back on (80 Ft Lbs!), get the car back onto a level surface!
Start and run the car, refill the cooling system, go for a ride!
Go have another beer, er or Coke kid.
