
|
|
What a relay does A relay is a kind of
"remote controlled switch".
From the inception of the electric starter, some kind of remote switch
was required in order to provide the power to the starter motor without
bringing the heavy, unwieldy wires to the dash and, as a result, making
them longer with consequent voltage drop. Having a remote switch allows
application and interruption of current to be done at the most
electrically efficient point in the circuit, even if it is the most
ergonomically least suitable position. At first, starter motors were
operated by pulling on a cable which operated the switch, much in the same
way that a bonnet (hood) latch is still actuated today.
The solenoids used for inertial engaged starter motors were
effectively relays. A switch, sometimes operated by a key, could pass a
small current to the solenoid which would move an actuator that would in
turn engage a bigger switch capable of carrying the very large current the
starter required. Later, pre engaged starter motors required that the
solenoid had to do more work, throwing the pinion into the ring gear
before making the electrical connection to the motor itself, and so its
electric current requirements went beyond the capability of the
ignition/starter switch. To overcome this limitation, a relay was used to
remotely switch the solenoid. Indeed, the first relay fitted to MGB's was
for this very purpose.
Basically, inside a relay there is a small electromagnet that
requires, in most automotive relays, about 0.25 Amps to operate it. Once
this small current is flowing, the electromagnet can pull-in (or if so
configured, let-go) a switch capable, depending on the relay, of
controlling many times that current, but usually from 30 Amps to 70 Amps.
Not only does the relay deliver more power to the load than could be
efficiently achieved with a dash or column switch and its associated
wiring but the dash switch and wires can be smaller, lower cost and have
longer life owing to the minimal heating and arcing that results from
switching, carrying and interrupting only 1/4 Amp.
Relay Types Description of commonly
available relays
Consultation with Omron and Siemens/Potter & Brumfield confirms that
their versions of this relay have continuous ratings of 40 Amps at 85ºC
and 35 Amps at 125ºC with an allowable 3 second peak in-rush of 120A and
interrupt capability of 60A for the NO contacts. The rightmost relay is a
so called super ISO, with a nominal 70A rating.
Also available is the half-ISO relay, shown at middle, used
for loads of <20 Amps on the NO contact and <15 Amps on the NC (the
full-ISO relay can also be used for these lower currents). A little harder
to come by, the size of the half-ISO can be advantageous and the weight is
a benefit if the installation precludes the use of a bracket and the relay
needs to be taped or fixed with a cable tie to the harness. All these
relays have special connectors available but standard individual blade
connectors fit .
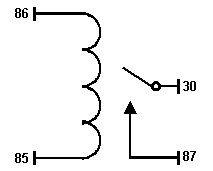
ISO Relay Contact arrangement for the ISO and Super ISO relays  The ISO relay has rather oddly numbered contacts,
the system having been carried-over from the original German DIN
specification. Each contact is 6.35 mm (1/8") wide and 11 mm (7/16") long. The ISO relay has rather oddly numbered contacts,
the system having been carried-over from the original German DIN
specification. Each contact is 6.35 mm (1/8") wide and 11 mm (7/16") long.
Note that, while it is
electrically irrelevant which way round the coil is connected, it is usual
to make contact 85 electrically closest to ground (see Using Relays).
Keeping to this convention helps others who may in future have to diagnose
any problems.
Where a bracket is fitted, there appears to be no convention as to its
position. I have seen examples with the bracket closest to contact 87, 85
and 30. In many US GM vehicles, the relays are in a bank, high on the
bulkhead. They are retained on a common bracket that has a number of
tongues each of which can fit into a slot, located on a relay. That slot
is closest to contact 30 and some relays with individual metal brackets
are GM type relays, the slot being used as the bracket retainer.
Always mount relays with the contacts pointing down, this attitude
prevents water build-up between contacts.
* Contact 30 is
sometimes marked 30/51.
High Current ISO A Super ISO Relay
1/2 ISO Relay Contact arrangement for the 1/2 ISO
Note that, while it is electrically irrelevant which way round the coil is connected, it is usual to make contact 1 electrically closest to ground (see High-side/Low-side Switching). Keeping to this convention helps others who may in future have to diagnose any problems.
Using the Relays High and Low Side Switching Detail application of relays will be covered in the appropriate sections. However, the following shows two major ways in which relays can be used. The reference in the diagrams to Power refers to power coming from such sources as the battery, a fuse or the ignition switch; it will usually be positive but could be negative, depending on the polarity of the vehicle. However, note that the power for the Switch and Relay coil circuit is sourced differently from that for the Load and Relay contact. In order to gain maximum benefit from a relay, the Load should be fed as directly from the battery, and via as heavier a cable, as is practical, whereas the coil can operate from much longer and lighter wire. High Side When the control Switch is closed current can low to the Relay coil and
it will be energized.
Once energized, the relay common contact will' make' with the NO
(normally open contact) and the load will operate.
This type of circuit is useful since the load can be grounded to the
chassis of the vehicle and there is no need for a separate Load ground
wire.
Low Side When the control Switch is closed current can flow to the Relay coil
and it will be energized.
Once energized, the relay common contact will 'make' with the NO
(normally open contact) and the load will operate.
This type of circuit is useful when the switch can be
grounded to the chassis of the vehicle and there is no need for a separate
Switch ground wire. |
|
|
|
|
|
By Rick
Astley
©Rick Astley 1999, 2000, 2001, 2002,
2003
Email:rrrricka@twmi.rr.comxx Edited with and reproduced permission from the author |
 The most commonly available relays are the
full International Standards Organization (Specifications ISO 7880 and
7588) size relays, also known as Minis and as ice cube relays owing to
their approximate 26 mm (~1") cubic size, illustrated at left of the
illustration. These are available with and without fixing brackets. ISO
relays are usually rated at 30 Amps but in fact, because this is a rating
for use at the maximum under-bonnet (hood) temperature found in modern
cars of 135ºC (150ºC in Europe), in most locations in LBC's they have
greater current capability.
The most commonly available relays are the
full International Standards Organization (Specifications ISO 7880 and
7588) size relays, also known as Minis and as ice cube relays owing to
their approximate 26 mm (~1") cubic size, illustrated at left of the
illustration. These are available with and without fixing brackets. ISO
relays are usually rated at 30 Amps but in fact, because this is a rating
for use at the maximum under-bonnet (hood) temperature found in modern
cars of 135ºC (150ºC in Europe), in most locations in LBC's they have
greater current capability.

 Versions
of the ISO relay exist with higher continuous current capability; about
70A. They usually have no NC contact and have larger Common (30) and NO
(87) contacts at 9.5 mm (3/8") wide and 17 mm (0.67") long. Otherwise, the
contact arrangement is the same as the standard ISO.
Versions
of the ISO relay exist with higher continuous current capability; about
70A. They usually have no NC contact and have larger Common (30) and NO
(87) contacts at 9.5 mm (3/8") wide and 17 mm (0.67") long. Otherwise, the
contact arrangement is the same as the standard ISO.
 The 1/2 ISO relay usually has more conventionally numbered contacts,
although some variants use the Full ISO numbering. Contacts 3 and 5 are
6.35 mm (1/4") wide. Contacts 1,2 and 3 are 4.75 mm (3/16") wide. All
contacts are 11 mm (7/16") long.
The 1/2 ISO relay usually has more conventionally numbered contacts,
although some variants use the Full ISO numbering. Contacts 3 and 5 are
6.35 mm (1/4") wide. Contacts 1,2 and 3 are 4.75 mm (3/16") wide. All
contacts are 11 mm (7/16") long.

 The diagram at left shows a
typical high-side relay switching arrangement. The Load may represent any
of several components in the vehicles, examples being the heater fan or
the headlights.
The diagram at left shows a
typical high-side relay switching arrangement. The Load may represent any
of several components in the vehicles, examples being the heater fan or
the headlights.
 The diagram at left shows a
typical low-side relay switching arrangement. The Load may represent any
of several components in the vehicles, examples being the horn or the
courtesy lights
The diagram at left shows a
typical low-side relay switching arrangement. The Load may represent any
of several components in the vehicles, examples being the horn or the
courtesy lights